Tuesday 16 May 2017

Wiring up a motorised valve

For most homeowners one look inside a central heating wiring centre is enough to convince them to get the professionals in, which is a shame because the most common failures in a central heating system are the pump and the motorised valves and these are both wired back to this complicated, spaghetti like, mass of wires.

Fortunately, things are getting easier. For pumps it was never that difficult, they only have 3 wires: live, neutral, earth and if you can’t manage 3 wires you really have to ask yourself if you should be doing this at all. That said, only good can come from keeping people away from the wiring centre, so these days the cable on most pumps comes with a kettle-like connector that can just be detached and plugged in to the new pump, the proviso being that you replace like-for-like.

For motorised valves, especially 3-port valves, it is a bit more intimidating. A 3-port valve has 5 wires: Neutral (blue), Earth (yellow and green), Hot Water Off (grey), Central Heating On (white) and Switched Live Out (orange). 

Fortunately, the number of wires and their colours is pretty much a standard across the industry so you can replace a 3-port or 2-port valve from one manufacturer with the valve from another manufacturer and not have to change any of the wiring in the wiring centre. On the downside, the cable supplied with the valve is usually directly wired into it and can’t be easily swapped over and if it does come with a plug the odds are that plug will only fit a valve supplied by the same manufacturer. As a result, you generally did have to replace the wiring at the wiring centre. This wasn't exactly rocket science as you just had to find the blue wire from the old valve and replace it with the blue wire from the new valve etc. But it was always fiddly work with plenty of opportunity for error.

Fortunately, there is a cheap and easy way of getting around this in the shape of Regin’s 5-way connector. It's a very simple idea, rather than take the old cable out of the wiring centre you just cut it off and fit a plug to the end of it. You then fit another plug to the cable on your new valve, push the 2 plugs together and hey presto. Not only does this make wiring up a motorised valve relatively straightforward but the connectors themselves are fairly cheap at about £6, although I'd be surprised if i they cost more than 30p to make.

To use these connectors just follow these simple steps:

Step 1
Cut the cable on the 3-port valve you are replacing (having ensured that the electricity to the central heating system has been completely switched off, that you’ve tested for this using a multimeter, and that the 3 amp fuse is currently safe and warm in your pocket)
Step 2
You should now have a loose bit of cable connected at one end to the wiring centre. Use a craft knife or a wire stripper to trim back the outer cable covering and expose the 5 wires within. Use your wire stripper to remove about 5 mm of the insulation from the end of each wire and use your fingers to twist the individual strands of copper for each wire together.
Step 3


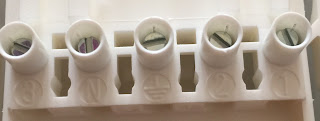
Take one side of the 5-way connector and have a close look. You can see that each connector is numbered 1 to 3 with the centre connector being labelled as the earth and the connector next to it marked N for neutral. It doesn’t really matter where you put the other 3 wires, the only thing that matters is that you use the same number for the same colour wire on both sides of the connection. So if you put the orange wire into number 1 on one side of the connector then you must put the orange wire into number 1 for the other side.
Step 4
Having wired up our loose cable we can now wire the cable that comes with the new 3 port adapter into the other side of the connector.
Step 5
Just to be certain, push the 2 connectors together and check that the same colour wires are joining up. Note that the colours can vary a little, one might be dark blue another might be light blue, but hue and tone aside the basic colours should match up. When you’re sure, fit the cover over the connector and use the 2 screws provided to secure the cable in place. Repeat this for the other side of the connector.
Step 6
With the covers on, push the 2 connectors together. They are shaped so that they can only fit together one way. Now switch on the electricity and Bob should be your uncle


Tuesday 2 May 2017

Tap Troubles

The humble box spanner
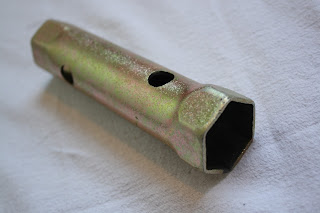
There was a time when if you wanted to fit a basin or bath tap you would dig out your standard half inch or three-quarter inch box spanner and tighten or remove the tap's back-nut with little or no bother. Alas, it would appear that those days are gone!

There's been a spate of taps entering the UK market recently that are no longer supplied with what I would call a standard back-nut. It's almost impossible to see if you are going to have an issue from just looking at the nut but when you try to tighten it using a standard tap box spanner it doesn't fit! I guess this could be a manufacturing error but it seems to be so commonplace that I'm assuming they are now using some metric version of the back-nut, a version that is exactly too big to work with the old Imperial box spanner.

The most annoying aspect of this is that not only do they not tell you this when you buy the tap but, because they are so similar in size, you don't get to realise there is an issue until you're stuck underneath the bath trying tighten up your new taps and failing dismally. It wouldn't be so bad if there was an alternative tool to use but, aside from a basin spanner, which is awkward to use at the best of times, there isn't. Occasionally you might be able to get by using an adjustable spanner but more often than not that's just not possible.

I dare say you be able to buy a new metric box spanner for these new taps in the not too distant future but for now it's just plain old-fashioned annoying, although you should be able to get around it by retaining the old back-nuts from the taps you've just taken off, so don't throw anything away until the new taps are on nice and tight.

Wednesday 28 September 2016

Latest Updates

Chrome
 Change seems to happen all at once or not at all in the plumbing world. Since the 1st Edition of the "Home Plumbing" manual not a great deal has changed. Ok, my prediction that the drain cock with a spherical valve rather than a washer would take off did not come to fruition, in fact it seems to have trudged off to a dark corner and quietly died a death.

So what has actually changed in the last few years? Well, for me at least, the two big advances have been the introduction of 'Layflat' pipe and connectors that mean that Chrome wastes are no longer the stuff of nightmares.

LayFlat Pipework

'Layflat' is not an apt description of the product, rather it is a marketing statement stuffed full of wishful thinking. An apt description of the product would run something along the lines of "Far less likely to take your eye out as it whips back into a coil" but I guess they'd have to sell it in bigger coils if they were going to get all that on the side of the box, so 'Layflat' it is.

The big advantage of plastic is that you can thread it through holes in the centre of your joists. As a result, your pipework is well away from errant hammers and nails, the joist isn't weakened anywhere near as much as it would have been if you'd notched it, and  you can avoid having umpteen joints in your pipework, which is always going to be a weak spot no matter how good your soldering.

Even better is that you can buy plastic pipework in really long coils, so that you can avoid joints all together if you need to. The downside of these coils was that, once coiled, the pipework was very reluctant to uncoil. This was a pain if you wanted to thread it through 3m of joists, a real pain for 5m and an absolute agony for really long runs.

I'm fairly sure that it was John Guest that first came out with this new type of plastic pipe but most of the plastic pipe companies seem to have a similar offering these days. I recently discovered a coil of the old pipework at the back of our lock-up and I'd forgotten just how awkward it was to use, especially if you're working on your own, compared to the new stuff.

I think they have now stopped selling the old pipework, so all plastic pipework - certainly that sold by John Guest - is this new 'Layflat' pipe, a change for which you should be eternally grateful.

Chrome Fittings
Solvent-weld to chrome, nicely done


In the manual I mentioned that chrome is a complete pain to work with. This isn't because it's very poor at transporting water and waste - although it's not the greatest. It's a pain because it never used to fit anything else very well.

The whole point of Chrome is that it looks nice so, if you are going to use it, you need the end result to look nice and shiny and neat. The problem was that sooner rather than later you needed to change from chrome to plastic pipework and that was never, ever, a nice, shiny or neat change.

You really only had two options: fit the chrome into plastic push-fit pipework or use a compression connector.

The problem with using plastic push-fit is that it's not really designed for this diameter of pipe and, whilst chrome pushes-into push-fit fittings easily enough, it also pulls back out again with little or no encouragement. This is bad enough when you can see the problem but when you hide the push-fit behind stud walls and under floorboards you are just asking for trouble.

Compression fittings aren't much better because they are huge and ugly and, once again, the chrome pipework can be pulled out again fairly easily - because the chrome pipework is slightly narrower and because chrome is pretty slippy stuff.

To add to the frustration, what you wanted your chrome pipework to join to - solvent-weld plastic - it obstinately refused to do so.

The end result was that I avoided Chrome pipework like the plague. Sadly, whilst the Black Death hasn't darkened my doorstep since the 1600's, Chrome keeps cropping up all the bloody time and has to be dealt with.

Fortunately those lovely people at McAlpine have come to the rescue with a series of fittings designed specifically for chrome waste pipework. This includes general chrome fittings, designed specifically for Chrome Waste pipework, lengths of chrome pipe itself and, most importantly of all, adaptors to take you from chrome to solvent weld neatly and easily.

I can sleep well at night once more :)

Wednesday 1 January 2014

Thanks for the reviews

Haynes Home Plumbing Manual
I’d just like to take advantage of the New Year celebrations to offer a large ‘thank you’ to all 29 people who have taken the time to log onto Amazon’s site and give my manual a rating, especially the 22 of you who gave it a 5 star.

Despite being a fairly eager reviewer myself I am pretty sceptical of these reviews, for the simple reason that they seem very easy to fake. So it was with some surprise that I discovered that I’d never even heard of the vast majority of my reviewers – yes one or two at the beginning were from friends, but then, at the beginning, they were the only people buying the damn thing. Since then I can say with hand on heart that I haven’t a bloody clue who these people are, although they are clearly wonderful examples of humanity with fine taste and sparkling intellect.

One of the best reviews for the manual is also the lowest star rating (3), which I think works quite well. Apparently she thought the manual was excellent but felt that I might make lots of money out of it and put plumbers out of business. Sadly, she is very wrong!

One of the many myths about writing is that you’ll make lots of money from it and sure enough some authors do seem to be doing very, very, well. Alas, this isn’t typical. In fact I’d go far as to say that taking up the pen in order to live a life of vast wealth and fame is like serving chicken at KFC because you’ve heard that there are people in the fast-food industry who are making millions.

Of course I was blissfully unaware of these financial limitations when my manual first came out. Ok, I wasn’t naive enough to think that people would be queuing up outside Waterstones at midnight, dressed as plumbers – aside from myself - but I did think that the manual would sell far better than it has.

Much of this was down to Amazon’s ranking system. By all accounts there are 6.5 million books available from Amazon, so when I saw that my manual was in the top 10,000 I naturally assumed that I was onto a winner. After all, if I was coming 10,000th in a Marathon that involved 6.5 million competitors, I’d be pretty chuffed.

Sadly, it doesn’t quite work like that. For starters most people who enter a marathon are fairly fit and have a reasonable expectation of finishing the race. The same cannot be said of many of the books offered by Amazon. To continue the analogy, many are well into their dotage, with a hacking cough, high blood pressure and a nasty limp. At least 4 million of them don’t even own a set of trainers and a couple of million are not even aware that there is a race going on, in other words, of those 6.5 million books only about 100,000 are actually being bought with any kind of regularity. At this point, whilst being ranked at 10,000th isn’t bad, it becomes clear that a lap of honour is unlikely and that medals are going to be in pretty short supply.

All in all, as a working plumber I probably make more money clearing blocked toilets during the year than I do from writing about them, which is a bit of a shame as writing is far easier on the old knees and, as a career, is almost effluent free.

On the plus side many of my own dreams have been realised; I have a published book! Ok, it involves slightly fewer buxom maidens and far more close coupled toilets than I’d originally imagined my first book would contain but at least I can say I am a published author. It also regularly outsells “A Tale of Two Cities” and Wilbur Smiths “When a Lion Feeds” and I must admit that I never thought I’d be able to say that. Ok, there is a rather large caveat here; it regularly outsells them on Amazon’s UK site. I dare say that whilst a large number of people in Japan and Brazil might be tempted to buy “When a Lion Feeds” (one of the all time favourite books from my childhood) few, if any, are going to pick up a book on UK plumbing – which I feel is a sad indictment of modern society... well maybe not.

So, once again, thanks to all those people who have bought the book and enjoyed it enough to go on-line and rate it. For those people who are merely thinking of buying the book, go for it! Don’t for one second think that the vast wealth that I’ll accrue as a result of your purchase will go to my head, cos it won’t... although I may be able to afford a bag of crisps to go with my Friday night beer down at the local, albeit not a big bag. 

Thursday 16 May 2013

Big Boss


The Big Boss
In the manual I touched briefly on the wonder of “bosses” - no not that annoying dip-stick that keeps on giving you hassle even while he’s paying your salary but the fitting used to connect pipes of different sizes to each other which, in order to encourage confusion, is also called ‘a boss’.

The most common sort of ‘boss’ that you’ll come across is the ‘strap-on-boss’ - which sounds like a sex toy but isn’t. The main problems with these are that the hole you need to cut rarely seems to conform to the standard sizes in most hole cutting kits, the strap itself is awkward to fit at the best of times and nigh on impossible to fit on every other occasion and if everything is less than perfect they have a habit of leaking.

The only reason they have a strap is to draw the boss onto the main pipe whilst the glue dries. So when you think about it there have got to be alternative approaches, yes? Well there are but most use some sort of rubber bung that you expand and they tend to be more expensive and rarely as good.

Fortunately there is now a better alternative, the “Big Boss”.

At first sight this just looks like a strap-on-boss that they’ve forgotten to put the strap on, then you notice the little flexible teeth on the inside. It’s these teeth that perform the job of the now passé ‘strap’.

To fit them just follow these simple steps:
  • Cut the hole, the size of which they have conveniently set to match the holes cut by most hole-cutting kits.
  • Get rid of any swarf and give the hole a little chamfer using either a round file or a utility knife.
  • Add your glue to the boss and the pipe.
  • Push the boss into place. The teeth put up a bit of resistance at first then they slide into the hole and snap open again, holding the boss firmly in place whilst the glue sets.


Not only do they seem easier to fit but they’re less prone to damage when stored in your van and are actually a little cheaper! The only downside I can see is that you might struggle to apply sufficient pressure whilst teetering on a ladder but, so far at least, I haven’t heard a bad word said about them.

You can buy them on EBay or just pop to your local plumbing merchants – PTS definitely sells them. The manufacturer, Rodetal, seems to shun the internet but they do have a blog to keep us all updated on developments as more and more sizes and colours become available.

Sunday 7 April 2013

Sauter Detach Motorised Valves

Detach 3-port valve

In a traditional central heating system - where you have a boiler and a hot water cylinder i.e. not a Combi boiler - the boiler itself has no idea what it is heating. All it knows is that cool water comes into it and - with luck - hot water leaves. Where that hot water goes is none of its concern.

The same cannot be said for the homeowner, who is often very concerned as to where all that fully-paid-for hot water is going, so most CH systems will have within them one or more ‘motorised valves’. These are usually hidden in the airing cupboard next to the hot water cylinder and they control what gets hot; the radiators, the hot water cylinder, or both.

To perform this vital function they contain a number of moving parts and the sad thing about moving parts, especially ones constantly immersed in water, is that sooner or later they give up the ghost and expire, usually in the dead of winter when they are needed most. As such they are one of the most frequently replaced parts of a central heating system.

We went through the process of how to replace these valves within the Haynes Home Plumbing Manual but at the time I had never heard of the “Detach” motorised valves by Sauter, possibly because they weren’t sold in the UK at the time. This was a shame because they seem to be very good valves that offer real benefits to plumbers and DIY enthusiasts alike.

First off they come with a detachable lead. This doesn’t sound like much but it’s the wiring that is often the most daunting aspect of replacing one of these valves. Quite why, in the vast decades that motorised valves have been around, no one else had ever thought of inventing a lead that could just be unplugged is one of life’s great mysteries, but fortunately Sauter did make that breakthrough and life is now just that little bit easier as a result.

Of course this is of little help if you’re putting a Sauter valve in for the first time but at least any subsequent repairs and replacements will be considerably easier.

Another nice point is the easy-to-detach head. This is where the actual motor – often called an actuator – resides and it is often this part that dies well before the main valve. As such it’s very handy if this can be removed quickly and easily. Fortunately most manufacturers offer this feature these days - Honeywell being the notable exception. 

Bizarrely, the Sauter valve doesn’t just rely on a nice simple button to remove the valve but insists that you remove a small screw first. This seems unnecessarily inconvenient bearing in mind that these valves are usually set in fairly cramped conditions, but there you are.

Finally, this is one of the few valves that actually tells you what it’s doing. Rather than listening for the sound of the motor, or trying to catch a glimpse of the lever arm moving this valve has a two lovely little lights, one labelled CH and the other HW. Again, a really simple improvement that was somehow beyond the wit of every other manufacturer.

To put the icing on the cake, they are also pretty well priced and rumour has it that they are looking to develop heads that will fit onto other manufacturers valve bodies, so you can get all the benefits of the Sauter Detach without the hassle of replacing the old valve completely.

All in all a very welcome product.

Thursday 21 March 2013

Magnaclean Professional 2


If you like money and hate a cold house one of the best things you can buy is a Magnaclean. 

It’s just a magnet fitted into the CH system – usually just before the boiler – and it removes all the magnetic debris from the water as it flows around the radiators and pipework. Since almost all of the debris in a central heating system either starts off magnetic or soon becomes mixed in with magnetic ‘stuff’ this means it takes almost all the gunk out of the system. As a result your boiler works better and lasts longer, your radiators generate more heat for less energy and your wallet can relax and take you out to the pub to celebrate.

The magnetic approach to cleaning a central heating system was so efficient and so simple that everyone got in on the act and slowly but surely the Magnaclean lost ground in terms of features, ease of use, ease of fitting etc.

Fortunately Adey are not the sort of company to sit around bemoaning their fate and so was born the Magnaclean Professional 2, which addresses all of the problems of the earlier version:
  • It is a piece of cake to fit, so much easier than the original, with far fewer parts to cause trouble. 

  • It’s got a drain off at the base now so you can drain down the contents, making it much easier to use as a dosing point for Inhibitor chemicals.

  • The older version could only be accessed by taking the lid off, meaning that you had to have quite a bit of clearance above the unit to service it. Bearing in mind that boilers are often crammed into tiny little kitchen cupboards these days, this was not a good idea. The new version solves this problem by using a push-fit mechanism to hold the unit onto its isolation valves. By simply loosening a screw you can now quickly detach the unit altogether, take it out of its tiny cupboard and service it at your leisure. So you now need very little clearance above and below the unit.

All in all it’s a much improved product and we’re fitting loads of them, partly because they are so good and partly because we’re trying to win a new van J